
If you’re here, then you must be searching for effective tips and tricks to block ads from Android phones. If so, then you’re at the right place that helps you resolve this issue.
Ads are pretty frustrating, especially when they appear when you are doing something important or are expecting an important message. Imagine that as soon as you wake up from bed, you wish to see greeting notifications from your beloved friends. But you ended up seeing unwanted pop-up notifications. How will you feel? No doubt that you’ll be frustrated.
However, now you don’t need to worry about these unnecessary pop-ups and notifications. There are several ways you can remove ads from Android phones. Yes, you read that right! There are ways to have a peaceful time with your mobile phone.
But are these ads important? What’s the exact purpose of these ads? First of all, pop-up ads are not necessary on smart devices. Sometimes, these ads can be detrimental to your data safety. Yeah, some scammers or cyber attackers even send alluring ads in order to have access to your device.
A pop-up notification has both advantages and disadvantages. If it is bothering you, then you must search for a solution. Well, this article gives you some tips and tricks on how to remove ads from Android phones. Let’s begin!
Table of Content
- Why Do Ads Pop-Up On Android?
- How Do You Determine Which App Causes Pop-Up Ads?
- Best Ways To Remove Ads From Android Phones
Why Do Ads Pop-Up On Android?
People may wonder why they often get ads; here are some reasons. More often than not, these ads appear when companies or businesses promote a service or product. However, often, these ads are risky. App developers get paid by the advertisers to show the ads to targeted users. However, it is part of the trade-off of downloading free applications on the Play Store.
Usually, scammers create such ads to hamper your safety. If you get frequent ads, then you need to think about your safety. Scammers can send malware using these ads; these malware can be risky for your device. They get into your Android devices through unsecured websites, patchable software, downloads, and bogus applications. In such a situation, it is advisable to take the initiative to block ads from Android phones. Still, is it possible to find a solution without knowing the problem? No, it’s not. So, prioritize identifying the application before addressing the issues. Here is how it is; take a closer look!
How Do You Determine Which App Causes Pop-Up Ads?
Spotting the root of the problem offers you the best solution. In that instance, avail these ways to find out the application that causes pop-up ads.
Method 1:
- Go to Setting
- Open Applications and click on Manage Apps
- You can find out the most recent app that pops up in the notification
Method 2:
- Once you see the notification or pop-up ad, swipe down to see the extended notification panel
- Long-press on the ad pop-up to view which application shows it to you
Method 3:
- Go to the Play Store
- In the top-left corner, you can see the Menu. Tap it
- Now, the most recent application appears at the top of the list
Method 4:
- On some Android devices, you can witness the ad pop-up application in the recent apps section available on the left of the home button
- This is an optional method, and not every Android user has it on their device
These are some simple ways to find the ads popping up in applications. You can use any of these methods to determine which app causes ads to pop up.
Let’s now take a look at the tips and tricks to remove ads from Android phones in the upcoming sections. So, let’s get started…
Best Ways To Remove Ads From Android Phones
Here are some of the best ways you can remove ads from your Android phones. Take a look…
1. Protect Your Devices from Problematic Apps
First things first, protect your device from problematic apps. This is one of the easiest tips and tricks to block ads from Android phones. Definitely, you should embrace the technological features, but it’s always advisable to ensure Play Protect is ON! Malware is also an important cause of unwanted pop-ups. The Play Protect feature of Google lets users download only verified applications.
To give a detailed explanation, Play Protect Google uses cloud-based app-verification services to determine whether the applications are potentially harmful or not.
Steps
- Open the Google Play Store
- Tap your Profile picture; you can see the Play Protect option in the long menu
- Tap Settings to turn on the option Scan apps with Play Protect
Apart from this, users should remove the problematic apps from their Android devices. Yes, if you know that a particular app is causing the issue, remove it instantly from the device. Sometimes, you can experience instant changes in your mobile after installing third-party applications. It might be pop-up ads, unwanted notifications, etc.
These changes clearly signify a problem with the app. It’s better to consider them as problematic apps and remove them if you are wondering how to block ads from Android phones in such a situation, worry not! Follow these steps!
Steps For Removing Problematic Applications
- Touch and hold the Power button
- Turn off Power
- Now, Reboot your device in safe mode, then Restart the Android devices
- Uninstall the suspected applications and restart the devices
- Then, check for the ad pop-up.
You can repeat this process until you find a solution. Still, the issues persist, and then you can move on to other tips and tricks to block ads from Android phones.
Also See: Android Security Checkup
2. Disable Website Notifications and Pop-Ups on Android
Couldn’t remove ads using the earlier method, and now worried about how to remove ads from Android phones? Well, worry not! Explore these simple yet effective tips and tricks to remove ads. Modifying site preferences and permissions on Android devices is crucial for controlling a website’s notifications and pop-ups.
Guess what? Users can change the camera and microphone and also customize other privacy settings in the site preferences and permissions. In this section, you’ll learn about important steps for blocking notifications from all sites on Android.

Blocking All Sites Notifications on Android
- Open Android Settings
- Tap Applications to choose an application for which you need to change the settings
- In the Privacy section, tap Permissions
- You can view the allowed, not allowed, and ask-every-time menus with permitted options
- Toggle Off the Notification button to block notifications from that particular application (s)
More often than not, blocking all sites’ notifications helps get rid of ads from Android. If you still face the problem, then give a shot at the next trick!
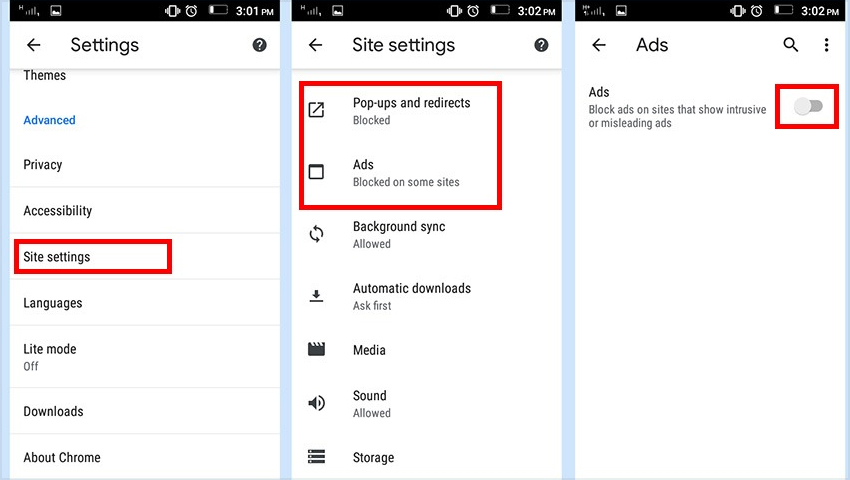
3. Block Ads in Google Chrome
Undoubtedly, every Android device has the built-in web browser Google Chrome. Reading terms and conditions is vital before you commit to any new app setting up your account in your new device. Ignoring to read T&C is not wise at all. People usually end up getting unwanted ads popping up and notifications from Chrome. However, there are a few tips and tricks to remove ads from Android phones. Thus, make use of them to get rid of the ad pop-ups from Google Chrome.
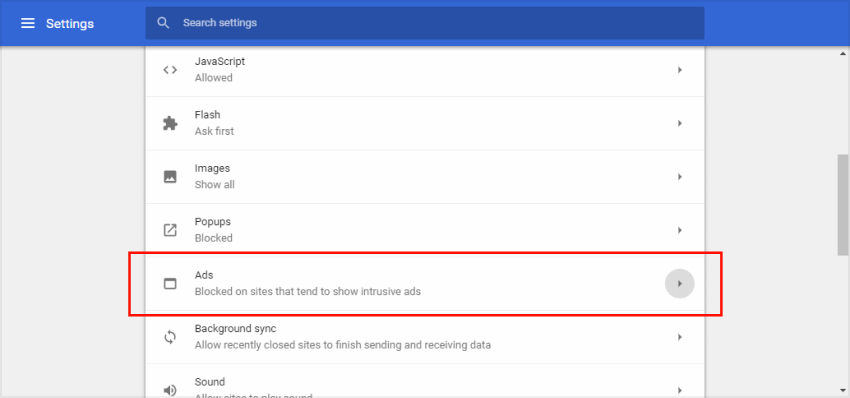
Steps to Block Ads in Google Chrome
- Open Google Chrome
- At the top-right corner, you can see the three dots
- Tap it and select Settings from the Menu
- Then click on Site settings
- Choose pop-ups and redirects, and check whether they are enabled or disable
- If it is enabled, then block it
- Then, go back to Site Settings and select Ads
- Block pop-up ads by turning the toggle switch
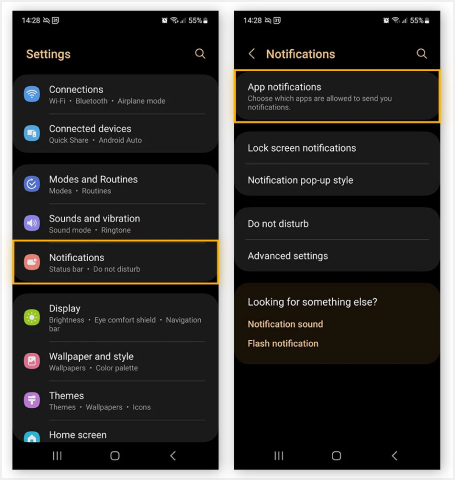
4. Ways to Stop Pop-Up Ads on Samsung
Turning off the notification setting on Samsung smartphones helps get rid of pop-ups from all sites and apps. Follow such effective tips and tricks to remove ads from Android phones.

Steps To Turn Off Notifications on Samsung Devices
- Swipe up on the home screen to access all applications
- Choose Settings and tap notifications
- You can see the Do not Disturb option in the menu
- Tap it and enter the next page
- Click on Hide Notifications at the bottom of the page
- Select Hide All and tap back
- Now, turn on the Do Not Disturb option
Following these steps helps remove ads from Android phones and lets you continue using the smartphones without any interruptions. Instead of hiding notifications for all applications, users can separately turn off specific applications. It means blocking the notifications of suspected applications is easy.
Steps To Turn Off Individual App Notifications
- Open Settings and notifications
- At the bottom of the menu, you can see all options; click it
- There is a drop-down menu available at the top of the page
- Choose the All option from the menu displaying Most recent, Most frequent, Blocked, and All
- Now, change the settings according to your preferences
If the unwanted ads pop up, as always, then try other tips and tricks to block pop-up ads from Android phones.
5. Stop Pop-Up Ads on Firefox for Android
Android users prefer using the Firefox browser, apart from Google. Firefox has abundant privacy tools, and its ultimate aim is to keep the user’s data and files safe. It automatically blocks third-party trackers, crypto miners, social media trackers, and others from collecting the data. However, users may turn on the pop-ups in a rush and get annoyed because of the notifications. They can try these steps and stop pop-up ads on Firefox for Android.
Steps to Stop Pop-Up Ads on Firefox for Android
- Open Firefox Beta
- Type about:config in the Firefox address bar
- Then, in the second search bar, type dom.disable_open_during_load
- You can see an option in the searched name, and make sure it is set to false
- If it is true, then tap Toggle to set it to false
Most of the time, these tips and tricks to remove ads from Android phones help people to get rid of unwanted ads. You can also try!
6. How to Avoid In-application Ads on Android
Here are a few things to avoid pop-up ads on Android. Follow them to block browser pop-ups and in-app pop-up ads.
Visit only trusted URLs with a valid SSL certificate and use free antivirus. Make sure you research the apps before downloading them. You can read the rating, reviews, and terms and conditions of the application. From this, you can identify whether the apps are ad-free or not. Enable Google Play Protect, and be careful while agreeing to the conditions.
To avoid in-application ads, users can upgrade to premium and enjoy their ad-free services. Keep an eye on the permissions. Yes, update the site preferences and application notification settings, and regularly update the in-app permissions. These are some simple yet effective tips and tricks to block ads from Android phones.
Winding It Up!
So, these are some of the best ways to get rid of the ads on Android phones. Using these tips, you can have enhanced entertainment. Advertisements and pop-ups are not always bad. Yes, they also bring happiness when they showcase seasonal discounts. But in most cases, ads become a burden. They hamper or interrupt one’s work. More than a distraction, frequent notifications can even drain the battery.
In addition, you cannot be sure of their authenticity as some of them could be scams or threats. Undoubtedly, a secure browser goes a long way and helps users have enjoyment and a smooth experience. Thus, follow the tips and tricks to block ads from Android phones outlined above and stay away from unwanted ads. Have a happy ad-and-pop-up-free browsing experience.

