
Losing data or setting up a new Android phone doesn’t have to be stressful. Thanks to Google Backup, restoring apps, contacts, photos, messages, and even device settings has never been easier. With just a few taps, you can bring back your important files and continue where you left off whether you’re switching to a new device or recovering after a reset. In this guide, find everything you need to know about how to restore an Android phone from Google Backup, step by step, so your digital life is always safe and accessible.
Prerequisites Before Restoring from Google Backup
Before you begin the restoration process, make sure the following conditions are met to ensure a smooth and error-free setup:
- Google Account Access: You must log in with the same Google account that was used to create the backup. Using a different account will not show your old backups.
- Stable Internet Connection: A strong Wi-Fi connection is recommended since backups often include large files like photos, apps, and videos. Mobile data may be slower or consume extra charges.
- Sufficient Battery Power: Ensure your phone is at least 50% charged or keep it connected to a charger to avoid interruptions during the restoration.
- Factory Reset or New Device Setup: Full restoration from Google Backup is available only when setting up a new device or after a factory reset. For specific items like contacts or photos, you can restore them anytime via Google Contacts or Google Photos without a reset.
- Updated Google Play Services: Make sure your device has the latest version of Google Play Services, as it manages backups and restoration.
How to Restore Android Phone from Google Backup (Step-by-Step Guide)
Restoring your Android phone from Google Backup can be done either during the initial device setup or after setup if you only need specific data. Here’s a complete breakdown:
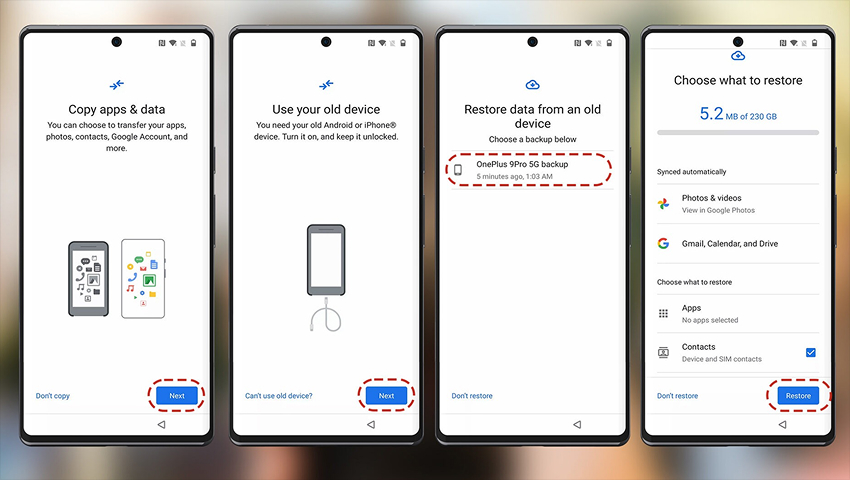
1. During Initial Device Setup
If you’re setting up a new device or have just performed a factory reset, follow these steps:
- Power On Your Device
- Turn on your new or reset Android phone.
- Select Language & Connect to Wi-Fi
- Choose your preferred language and connect to a stable Wi-Fi network.
- Sign in With Your Google Account
- Enter the same Google account used for the backup.
- Choose “Restore from Google Backup”
- During setup, you’ll be prompted to restore your data.
- Select the Backup You Want to Restore
- If multiple backups exist, select the one from your previous device.
- Confirm Settings, Apps, and Data
- Review what will be restored (apps, contacts, SMS, call history, settings, etc.).
- Wait for the Process to Complete
- Depending on your internet speed and backup size, this may take a while. Once finished, your phone will look and feel just like your old one.
2. After Setup (Restoring Specific Data)
If you skipped restoration during setup or only want to recover specific files, here’s how:
- SMS & Call History
- If SMS and call backup was enabled, install Google Drive and go to Menu → Backups to check availability.
- Some devices allow restore through Settings → System → Backup.
- Contacts
- Open Settings → Google → Settings for Google Apps → Google Contacts Sync.
- Alternatively, go to Google contact and sync with your device.
- Apps
- Open the Google Play Store → Manage Apps & Device → Library.
- Reinstall previously used apps from the list.
- Photos & Videos
- Open the Google Photos app (or install it if not preloaded).
- Sign in with your Google account, and your backed-up photos/videos will automatically appear.
By following these steps, you can easily restore everything from your Google Backup, whether it’s a complete device setup or just select data like contacts, photos, or apps.
Related Post: How to Download WhatsApp Backup from Google Drive
Common Issues and Troubleshooting
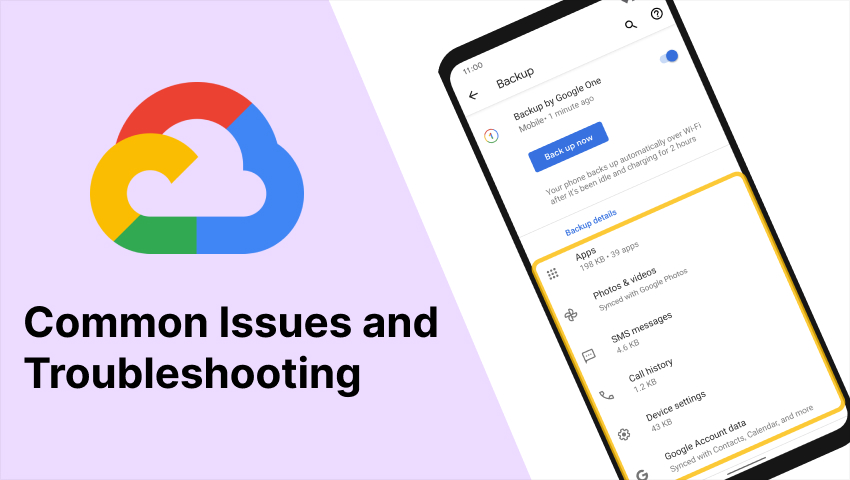
While restoring an Android phone from Google Backup is usually seamless, you may face a few issues. Here are some common problems and how to fix them:
1. Backup Not Found
- Cause: You may be signed in with the wrong Google account or backup wasn’t created.
- Fix: Double-check that you’re using the same Google account as your old phone. Go to Google Drive → Backups to verify if your backup exists.
2. Restore Option Not Showing
- Cause: This usually happens if the phone was already set up.
- Fix: Perform a factory reset and go through the setup again to see the restore option.
3. Contacts Missing
- Cause: Contacts may not have been synced before backup.
- Fix: Go to Settings → Google → Account Services → Contacts Sync and enable sync. Also check Google Contacts to ensure your contacts exist online.
4. Apps Didn’t Restore
- Cause: Sometimes apps don’t auto-install due to network issues or Play Store errors.
- Fix: Open the Google Play Store → Manage Apps & Device → Library and manually reinstall apps from your list.
5. Photos & Videos Missing
- Cause: Google Photos backup wasn’t enabled or used a different account.
- Fix: Open Google Photos → Settings → Backup & Sync and make sure it’s turned on. If not, check the correct account where backups are stored.
6. SMS & Call History Not Restored
- Cause: Not all Android devices support restoring call history/SMS from Google Backup.
- Fix: Check if SMS backup was enabled under Google Drive Backups. If missing, consider using third-party apps like SMS Backup & Restore.
7. Slow or Stuck Restore Process
- Cause: Weak Wi-Fi or large backup files.
- Fix: Connect to a strong, stable Wi-Fi network, plug in your phone to avoid battery drain, and be patient as large backups may take time.
With these quick fixes, you’ll be able to resolve most issues and ensure a smooth restoration process for your Android device.
Tips for Smooth Backup & Restore
To ensure a hassle-free experience when restoring your Android phone from Google Backup, follow these best practices:
1. Always Keep Backups Updated
Make sure automatic backups are enabled in Settings → Google → Backup. This ensures your latest apps, settings, and data are saved regularly.
2. Use a Stable Wi-Fi Connection
Large backups (apps, photos, videos) require high-speed and stable internet. Avoid mobile data to prevent incomplete restores or extra charges.
3. Charge Your Device During Restore
Restoration can be resource-heavy and drain battery quickly. Keep your phone plugged in during the process to avoid interruptions.
4. Verify Google Account Access
Double-check that you’re signed in with the same Google account used for the backup. Multiple accounts can sometimes cause confusion.
5. Enable Backup for Photos, Contacts & SMS
Not all data is included in a standard Google Backup. Ensure Google Photos Backup, Contacts Sync, and SMS Backup are turned on before switching devices.
6. Be Patient with Large Restores
Restoring apps, files, and media may take hours depending on backup size. Let the process complete without interruptions.
7. Manually Check After Restore
Once restoration finishes, verify contacts, apps, photos and settings. Manually reinstall or re-sync anything that didn’t restore automatically.
Following these tips will help you avoid common pitfalls and ensure a smooth transition to your new or reset Android device.
Conclusion
Restoring your Android phone from Google Backup is a simple yet powerful way to get your apps, contacts, photos, and settings back in just a few steps. Whether you’re setting up a new device or recovering from a reset, Google’s backup and restore feature ensures your important data is never lost. By keeping your backups updated, using a stable internet connection and verifying account access, you can make the process seamless and stress-free.
With the right preparation, you can switch to a new Android phone or recover a reset one without losing precious memories or productivity. Think of Google Backup as your safety net always ready to help you pick up exactly where you left off.

